3 Striking Colour Combinations for Your Interior

Choosing cohesive interiors can be tricky…

Here’s a cool, warm and vibrant scheme to get you on your way.

cool flatlay-2-web.jpg
  1. Cool Colour Scheme.

How to pull together a successful cool colour scheme.

So you love the thought of some cool vibes for your home?

Here’s some tips on what to consider to make this scheme work.

  • Paint Colours - Choose blue, green, greys and whites with cool undertones to set the foundation. Steer away from warm neutrals.

  • Bench Tops - Look for any bench top material with cool greys, blues or whites. Here I picked a subtle cool grey marble benchtop to bring some visual contrast to the bolder wall colours.

  • Tapware - Gravitate towards chrome, brushed nickel, power-coated white or black fixtures. Mix your metals within this parameter throughout your kitchen and other wet areas.

  • Handles - Include textural materials in choices such as handles, so things still feel cosy and welcoming. You may want to consider leather pulls in a deep olive or muddier grey to sneak in a hint of warmth without the obvious reds/pinks.

  • Tile - Consider muted or pastel blues, greens, whites, greys for tile. Choose at least 2 different cool tiles for within all your wet areas for interest (e.g. I chose the dark grey kit kat tile for a kitchen splash back, and the muted blue squares for the bathroom).

  • Grout - Stick to a white or any gradient of cool grey. Here I went with a light and medium toned grey. Again choose different grout for different areas in your home for interest.

  • Cabinetry - Investigate cooler stain colours in wood veneers to pull as much texture as you can into your space. Remember to contrast your tile with your cabinetry (e.g. a lighter tile choices with darker cabinets).

  • Fabrics - Mix block colours with pattern to create balance in your scheme. Here I’ve chosen a mint green, along with a charcoal/crisp white stripe and a mustard to warm things up a little.

Enjoy your pulling together your cool colour scheme!

warm flatlay-web.jpg

2. Warm Colour Scheme.

How to pull together a successful warm colour scheme.

More of a warm palette person?

Here’s some tips on what to consider to make this scheme work.

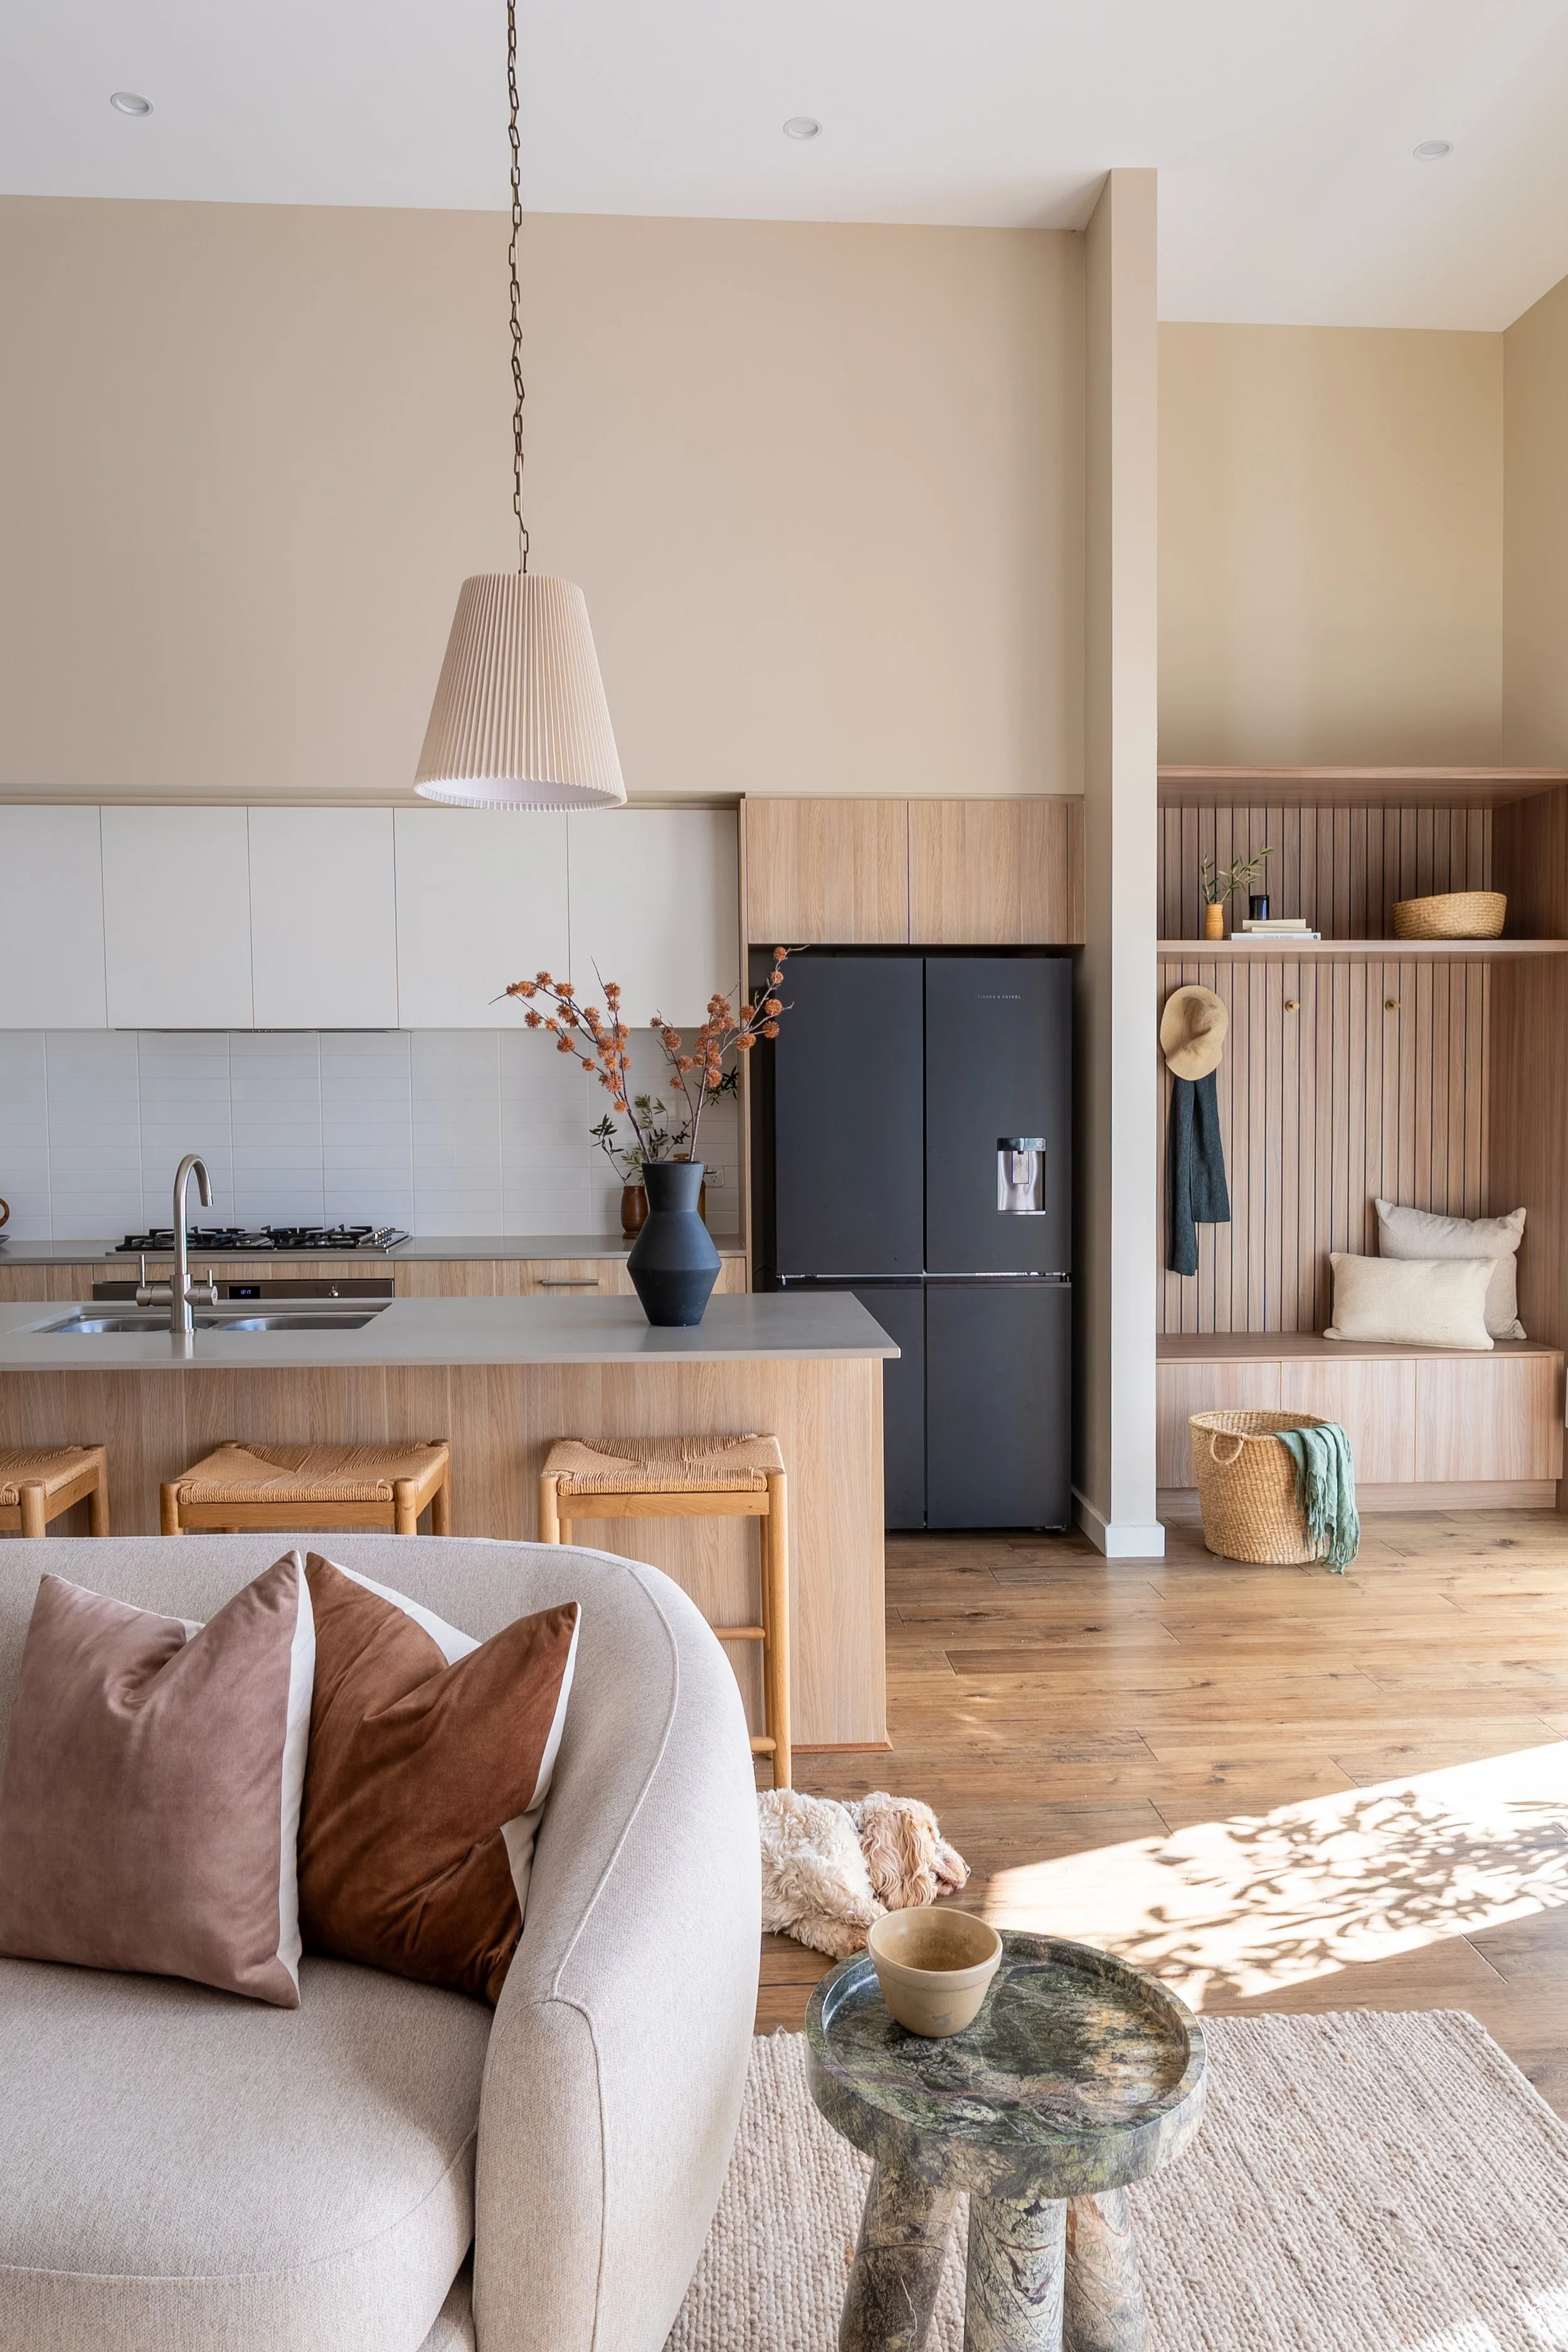
  • Paint Colours - Choose from pinks, oranges, reds and warm yellows. Look for any warm neutrals such as biscuit, warm greiges, taupes and beiges and whites with warm undertones. Put all your paint swatches together to ensure they all look ‘warm’ together as a whole.

  • Bench Tops - If you’re choosing a bolder paint colour perhaps look for a warm neutral for a benchtop, or you could swap this around and go for a real statement piece on your benches. Timber is an option for a warm scheme too.

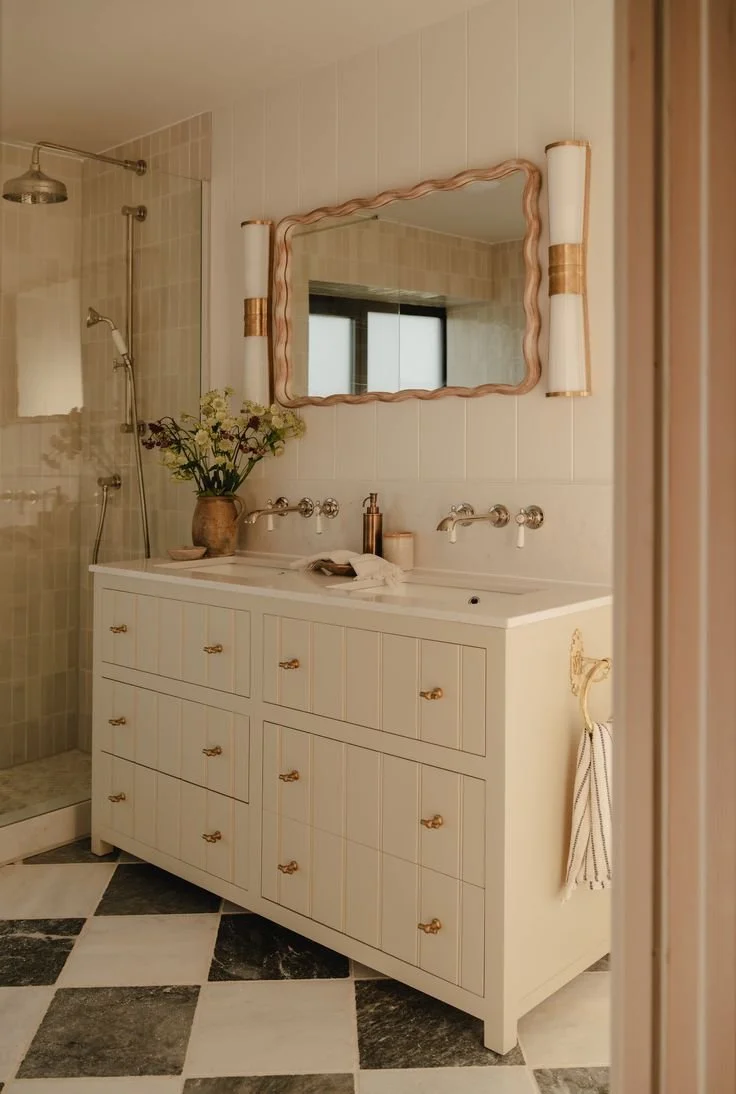
  • Tapware - Look for brass, bronze, gold fixtures. Mix your metals with some white or even some brushed nickel to add a hint of coolness.

  • Handles - If want to consider leather pulls a natural pink-toned leather a or tan would work beautifully.

  • Tile - Consider muted or pastel pink, yellow, cream or warm whites, alongside a warm brown or greige for some depth. Here I chose the dark greige small square tile for a kitchen splash back, and the muted pink bigger squares for the bathroom. Both warm options within a light-dark range.

  • Grout - Stick to an off white or any gradient of brown or warm grey. Again choose different grout for different areas in your home for interest.

  • Cabinetry - Peruse the many warm timber stains. With so many options such as light oak, honey and warm walnut, you’ll be inundated with choice! Contrast the timber with a matt laminate option in a biscuit, beige or warm neutral. You don’t have to use the same cabinetry choice throughout your space.

  • Fabrics - Look for some hues such as blush, rust, terracotta or beige. Equally you can go all out with a bold red or orange if that’s your thing. Mix block colours with pattern to create balance in your scheme.

    Enjoy your pulling together your warm colour scheme!

vibrant flatlay-medium-web.jpg

3. Vibrant Colour Scheme.

How to pull together a successful vibrant colour scheme.

What about our colour lovers?

Here’s some tips on what to consider to make this scheme work.

  • Paint Colours - You have many options open to you, with the thousands of paint swatches available! Sit down and choose your 3-5 main hues so that you can keep things cohesive and connected through out your space. Consider using full strength, half and quarter strength of the same colour. Equally branch out with a strongly saturated colour for your walls if this suits you.

  • Bench Tops - If you’re choosing a bolder paint colour perhaps look for a more muted benchtop. It comes down to balance and not having too many ‘hero’ pieces competing for attention.

  • Tapware - Again you have your choice of metal fixtures. Mix your warm and cool metals for an added level of interest.

  • Handles - If want to consider leather pulls, a deep navy or black will help to ground other strong colours you may have chosen.

  • Tile - Consider a more neutral tile alongside a coloured grout (such as the blue grout and warm neutral tile in my scheme). This is such a playful use of colour and so effective. Equally you can go for a bolder tile for contrast in another space in your home.

  • Grout - With many grout options available to you, choosing a less typical colour is what an colour obsessed person would do here!

  • Cabinetry - Remember to use cabinetry to allow other stronger elements (such as wall colour) to really stand out. You can reverse this idea if you prefer. In my scheme I’ve chosen a light timber and beige option for my cabinetry, as I want the dominance to come from my paint choices.

  • Fabrics - Sometimes contrasting some beautiful patterns with some neutrals can add to that sense of balance in a vibrant space. Perhaps choose some more pared back options to side alongside a bolder colour choice here.

    Enjoy your pulling together your warm colour scheme!

So there you have it.. 3 examples of different, but equally lovely, colour combinations for your interior.

You can use these tips to inspire you with a whole home selection, or you may just be working on your kitchen or bathroom. Once you have determined where you sit on the cool, warm or vibrant spectrum you can begin to make the selections that suit you best!

A helpful way to do that is to place your selections together in a flatlay (where you over lap samples and look at them all together), and determine how well they work as a whole. Really so much fun!

Don’t despair if you don’t find this enjoyable. I can help turn your overwhelm and confusion into clarity when it comes to all things colour schemes and selections - remember this is what I do! So reach out for a complimentary call as I’d love to hear about your project and any help you might need.

Until next time, Bec
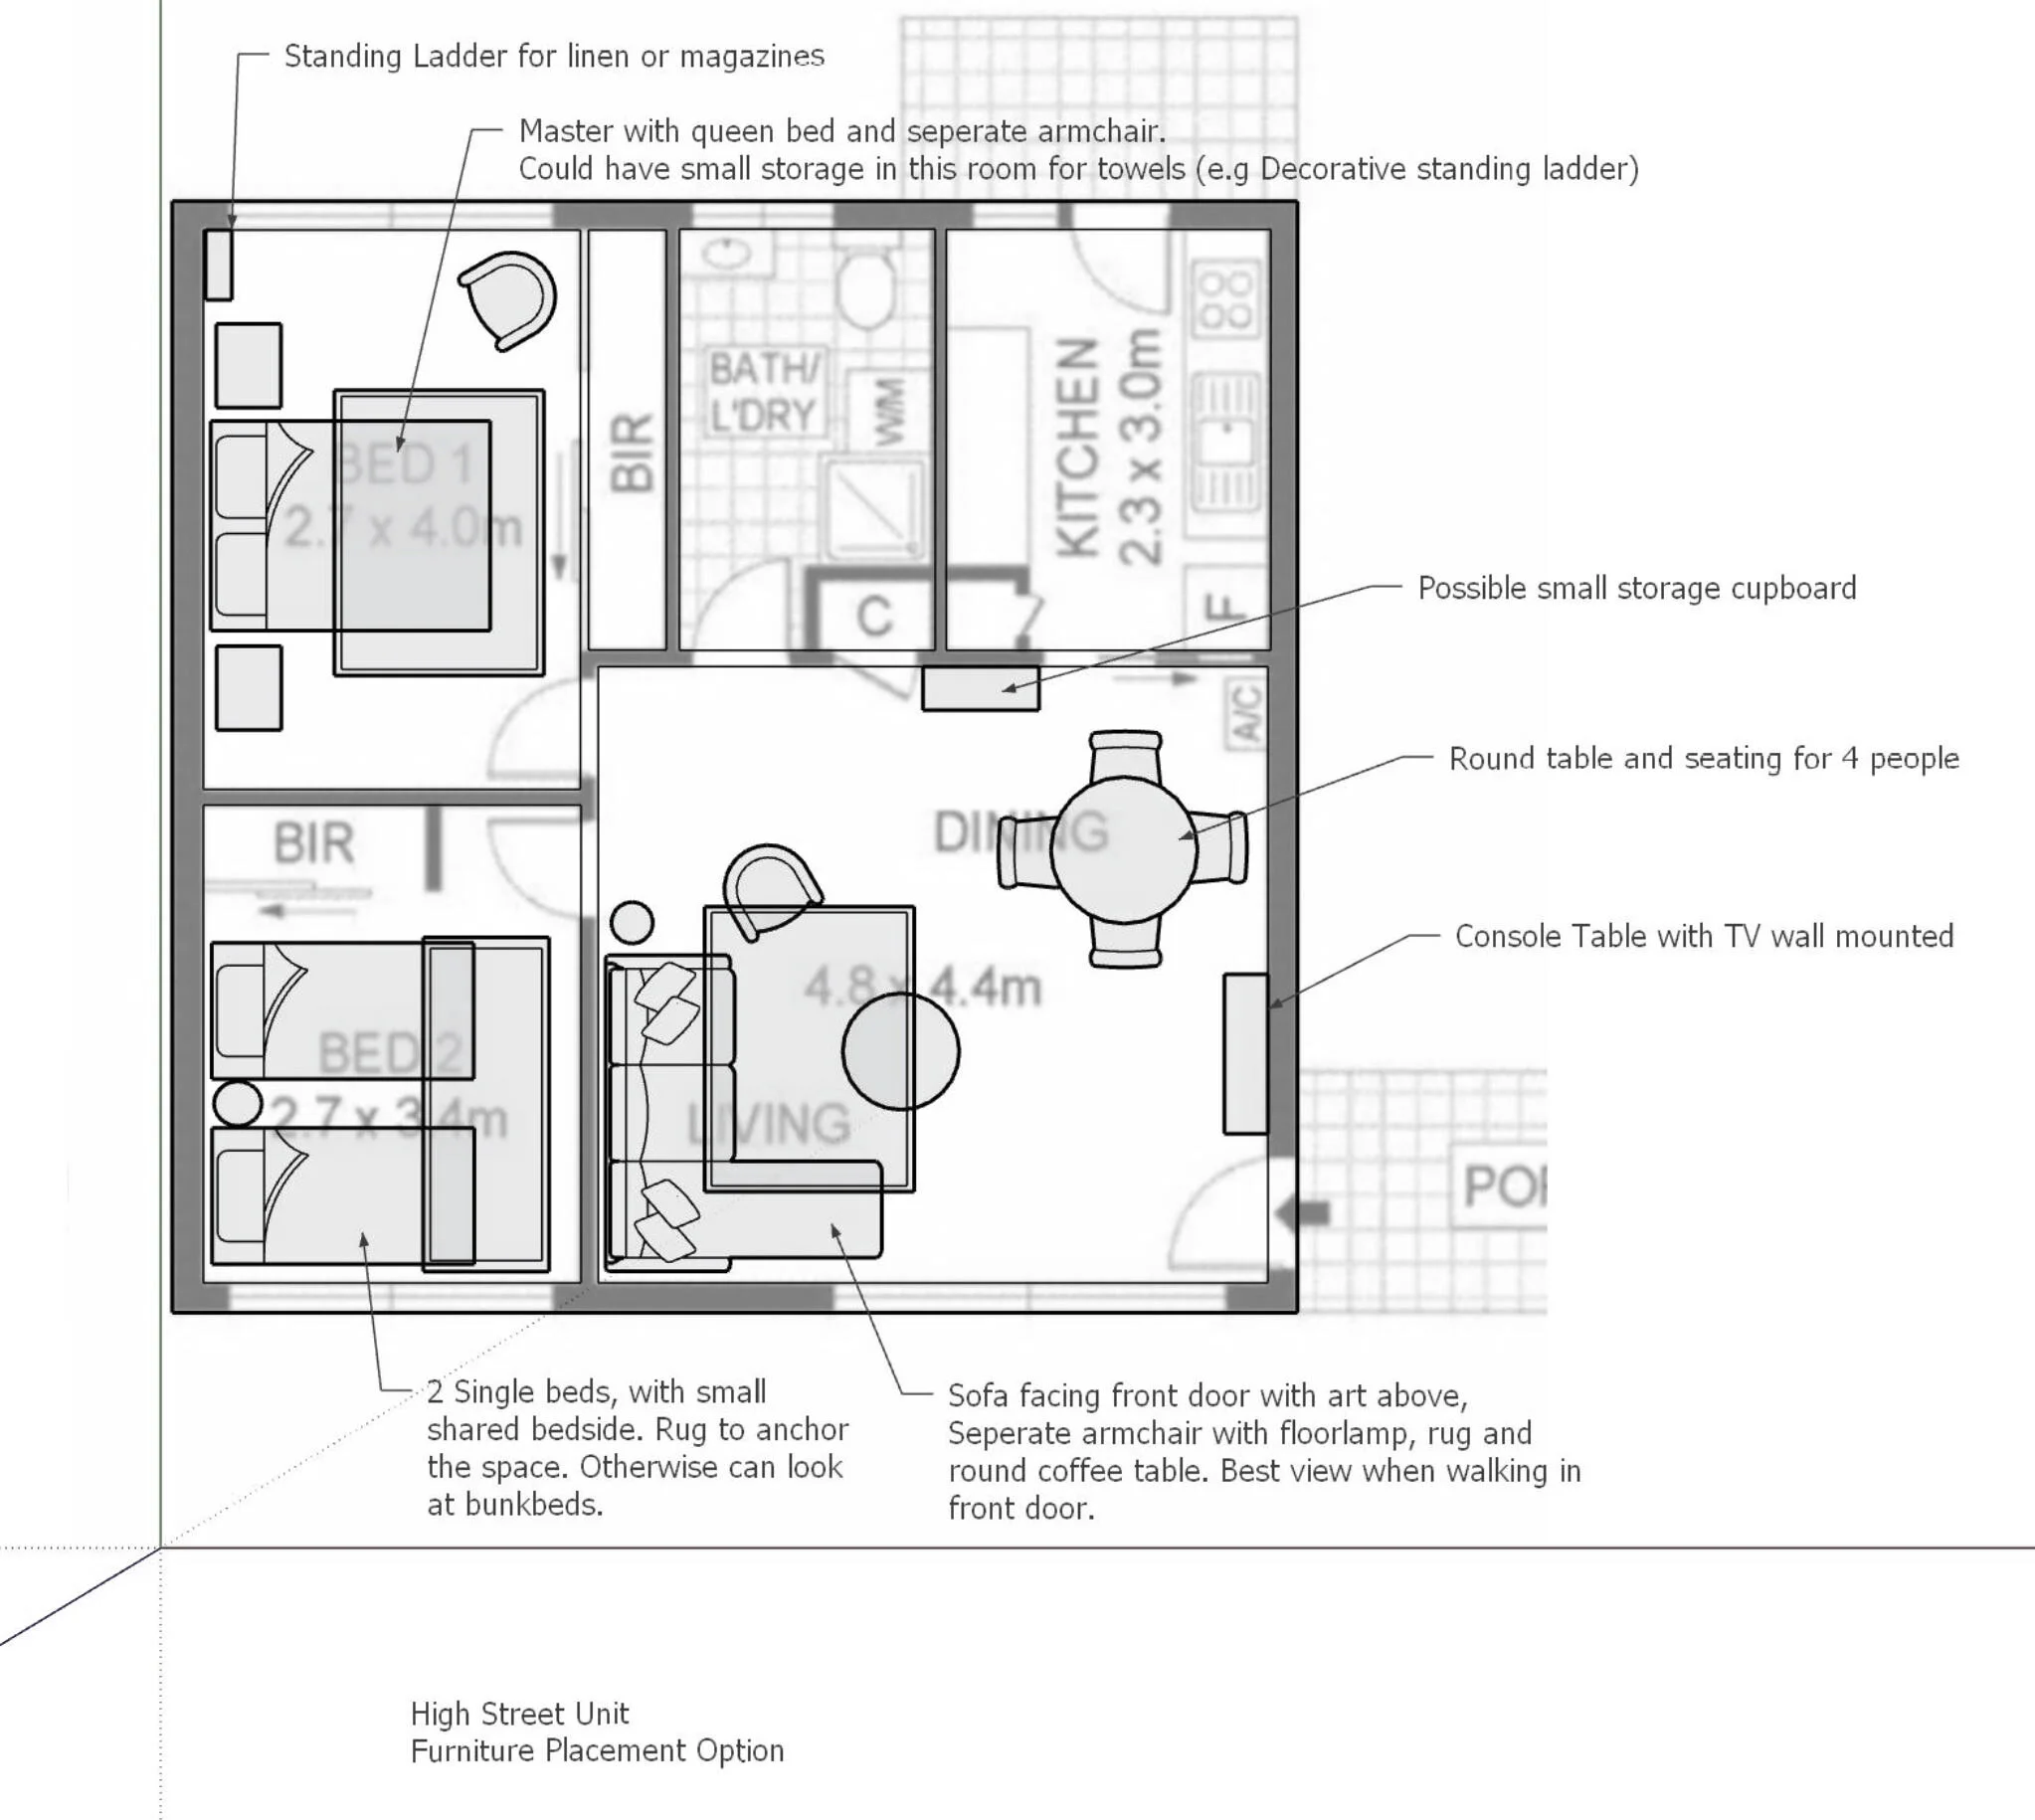
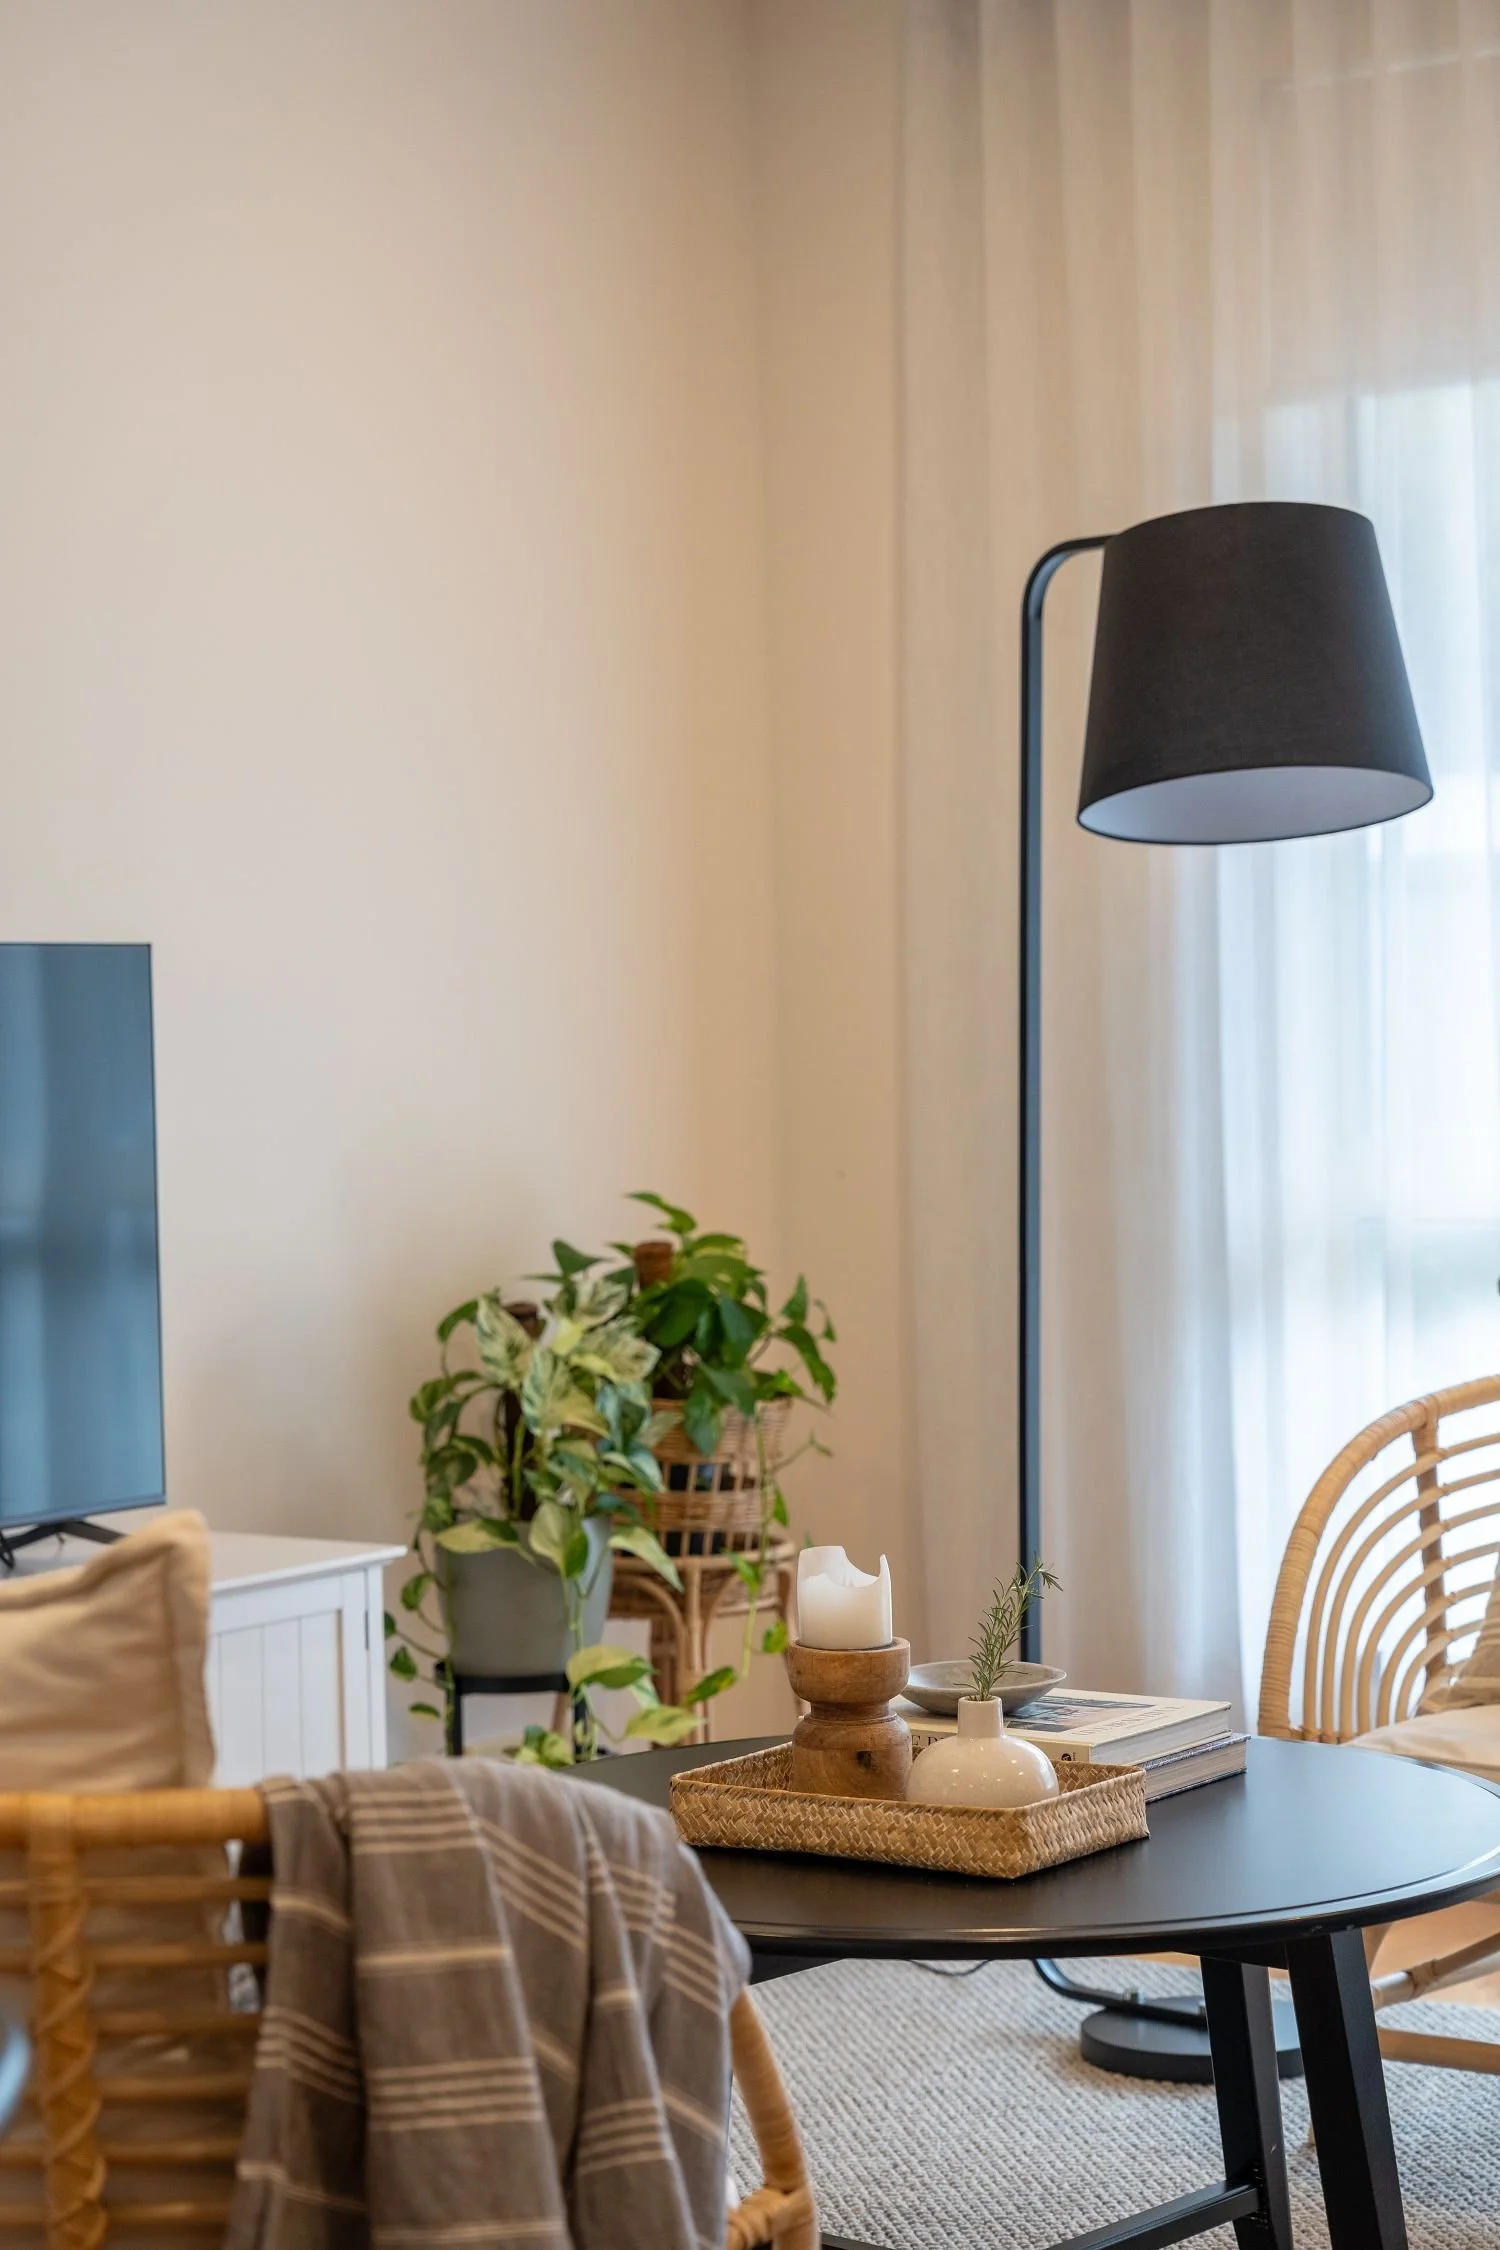
How much does it cost to deck out a master bedroom?

A budget for updating your master bedroom?

Well, how long is a piece of string?!

premium master moodboard-2.jpg

In reality your budget will not be the same as the next person when it comes to updating things in your home. And that’s ok! With good design and careful selections a master bedroom can look quite high end on a modest budget, or perhaps you are ready to invest a bit more into this space and want to turn it into the sanctuary you know it can be.

Where ever you are on the budget spectrum I want to help take away some of the mystery for you on what you can expect to pay in turning your master bedroom into the boudoir of your dreams. The simplest way I communicate budget with homeowners is through the basic, medium and high examples. Often it’s hard to know how much the total for a whole room refresh will cost, but these templates can bring a lot of clarity to the confusion.

*A note here. Every template includes the budget for an occasional chair, side table, x2 A3 pieces of art, vase, book, magazine and small decor piece for this additional reading nook area not shown on the moodboards.

It’s also worth saying that I kept the art supplier the same throughout, Love Your Space, because I love their options and they are a great Australian small business!

Let’s get started with the Basic look..

This look is pulled together using everyday more affordable retailers, and shows you what you can achieve with careful thought put into your colour and textural choices.

Let’s break down the cost of the Basic master bedroom.

Let’s break down the cost of the Basic master bedroom.

Basic master costings.png

Now onto the mid range look…

Here I’ve shown examples of slightly more expensive options mixed with a few more affordable choices. The budget gets close to double the basic example as each piece is that little bit more. This is a good example of how small upgrades do add up in the end.

Here’s the Mid range master bedroom, let’s look at the costings.

Here’s the Mid range master bedroom, let’s look at the costings.

Mid range master costings.png

Finally, here’s the splurge with the High end look…

I admit I went to town on this example! These selections are using a mix of higher end retailers and more boutique suppliers to give a unique and bespoke look. This sort of look does cost, but you can expect a design that will last the test of time. The budget for this room is four times that of the basic master bedroom look and shows you what you can expect if you love these types of suppliers.

Lastly, here’s the High end master bedroom. Let’s jump into the costings below!

Lastly, here’s the High end master bedroom. Let’s jump into the costings below!

High range master.png

So there you have it, 3 different budgets for your master bedroom update. Regardless of what you have to spend you can achieve a beautiful look with thoughtful design choices, and I hope these templates give you a starting point for when you are thinking all things money.

Happy designing! And remember if pulling it all together is beyond you and you’d like some extra help - I’m only an email away. Reach out here at hello@designrelease.com.au

5 signs you need the help of an Interior Designer

Who do Interior Designers typically help anyway?

side board styling-ig.jpg

There is confusion out there on the sort of person who would benefit from an interior designer. Let’s break it down to make it clearer. The truth is, we interior designers help a lot of different folk!

Here’s 5 Indicators that you might be one of them.

  1. You’re time poor.

  2. You’re afraid of making wrong choices.

  3. You’re confused when it comes to the details.

  4. Your budget has given you decision paralysis.

  5. Your desire for your home to feel special has left you overwhelmed .


Relate to any of these? Read on to see if these 5 common obstacles could have you benefiting from some time with an interior designer.

1. You’re time poor.

You’re a busy mum who cares about your home, but you don’t have the time to make it the perfect space for your family. Or you’re a frantic full-time worker who is booked up on the weekends, and the lack of time means you never get round to getting your home up to scratch. Either way you’re just putting up with your space as it currently is because you know you don’t have time to do it justice. Your space deserves more time than you can give it!

Or you might be 85% done, but it is the nagging 15% that you can’t seem to carve out time in your diary (or your hubby’s calendar) to finish. You have that, ‘I’ve conked out 10 metres before the finish line’ feeling.

2. You know enough to be afraid to get it wrong.

Those around you believe in your design capabilities. Isn’t this a good thing you’re asking yourself? Hear me out and see if this is you. Everyone has confidence in your ability to pull your home together that you don’t have the heart to say that you could do with a hand. You feel the expectation of those closest to you that you can make it happen, and we all hate to let people down.

After all you might know what you love and might be tempted to ask, ‘how hard can this design thing be?’ You know the looks you love and the styles (or blend of styles) that speak to you. But when it comes to the confidence to place items, invest in the right piece, lay out that room or get the proportions right, you’re not so sure.

3. You have big picture vision, but the details make your head spin.

You have good taste. You have a strong design aesthetic. You have a handle on the bulk of your choices. But when it comes to the small decisions that bring the overall vision together, that’s when your self-belief wavers. The practical decisions like picking paint colours, handles for kitchen cabinets or that feature wall paper start to make you feel confused and slightly overwhelmed.

4. Your hard-earned budget has left you paralysed.

Your hard-earned budget is just that, hard earned. Finally, you might be ready to update your space and do it right, so you feel the pressure to spend every dollar wisely. Now that you some savings to invest into your home you feel decision overwhelm kicking in. You discover there are actually hundreds of options for you to choose from, and the dread of choosing the wrong one feels paralysing.

Or you’re not at the place with your finances to do the big overhaul, but you’d like to update some of your spaces in a budget friendly way. Either scenario requires you to know how to make wise spending choices, and you’re not 100% sure you will get this right. Your budget will only stretch so far and it’s a fact you’re keenly aware of.

5. You prioritise the feel of your home to the point of overwhelm.

It is of upmost importance to you that your house feels like your home. Sounds simple doesn’t it?! You remember those times you have walked into spaces that ‘look’ amazing, but don’t ‘feel’ amazing. For whatever reason they don’t have soul; they feel clinical or they don’t seem to be an extension of the people that live in them. There is a mis-match. You understand that this special ingredient, this ‘X factor’, is perhaps the most important unseen element of what makes a house a home.

You might have lots of interior magazines, bulging Pinterest boards, and know what rooms on paper (or screen) resonate with you. But you’re unsure if you can create a room (or a whole house) that gives you that same feeling that you have when you look at that picture. Feelings like safety, comfort, peace and individuality.

Bec_mantle.jpg

So, could you do with the help of an Interior Designer?

Well perhaps you could!

You know if it would really help to chat and get some advice on a few things, or a lot of things. And just a heads up, a good interior designer will be approachable and a great listener. We are passionate about helping you create a space you love. Our aim is to collaborate with you every step of the way, whether you need us for only a 2-hour consultation or a full project- don’t be afraid to reach out!

Email bec@designrelease.com.au if you’d like to ask any questions.


Master Bedroom Makeover: The best ways for fresh results.

Are you thinking about jumping on the Airbnb bandwagon and want to know how to set up the master bedroom?

Like to learn more on how to inject some styling secrets into the space?

In this post I want to take you through the steps I considered to turn a slightly tired looking bedroom space into the fresh Airbnb coastal boudoir I knew it could be.

bed1-web.jpg

The backstory to the Airbnb worthy makeover.

You may have already read about this in previous posts, but in case you haven’t…

The unit had been the home of my sister in law until she had decided to rent it out. And to recap on my previous blog post, she had approached me with the idea of turning it into a seaside Airbnb. She asked if I could help her bring the future holiday rental to life and of course I said yes!

I needed to turn this little unit into something that would appeal to the holiday rental market – and I didn’t have a lot of time or budget on my hands to make it happen.

bec-bed-master-web.jpg

My tips to achieve a coastal Airbnb master bedroom.

Here’s the steps that helped move me from underwhelm to inspiration as I tackled the transformation of the master bedroom. I hope these steps are helpful if you’re considering your own coastal Airbnb makeover and you’re not sure where to start, or if you’d just like to know more about how I pulled it off…

The best layouts for Airbnb master bedrooms.

The aim with your layout for a master bedroom is to keep it spacious and cosy at the same time. We can fall into the trap of stuffing too many things into a small space, but just because you can doesn’t mean you should. The layout should exude a feeling of breathability and flow, no one wants to stay in a cluttered Airbnb.

I find the best layouts are ones where you walk into the room and view the bed and bedsides as you enter. Even better is the use the space above the bed for some artwork to draw the eye immediately. Ensure that the bedsides are close to the bed, not floating in space off to the side (it helps to think about the bed, bedsides, art and rug almost as one item).

A second zone for relaxing in the master is a real luxury. It doesn’t have to be a huge space, just enough to comfortably sit and not block access to doorways and the sleeping zone. Lastly, if you have a view and/or lots of windows, orientate this zone towards it. This increases the relaxation factor automatically.

Specifically, for a small Airbnb master bedroom:

1.       Have artwork above the bed be the hero piece as you enter the room. (and it needs to be in proportion to the bed, not teeny tiny!)

2.       Incorporate a second zone into the bedroom if you’re able – a seating nook is perfect.

3.       Include ample layers. Always plan to include those important extras such as rugs, different sized cushions, throws. Your aim is the comfort of your future guests.

Coastal style touches.

Typically, a coastal/Scandinavian look is light and airy, fresh and textured. Think about how your layout can highlight those styling choices best as your guests enter the master bedroom.

1.       Position furniture so guests can see all your cushions/throws on entry. It’s these items that pick up your coastal colours and textures.

2.       Have lightly toned furniture as a feature (I used the bed in this way), and remember the blond timbers contrast beautifully with darker tones in the room.  

3.       Always feature texture in your layout. Mix up your use of textures to bring automatic comfort and warmth. This is especially important when your colour choices are more muted and understated (I used a rattan side table with a luxurious leather chair, alongside a textured rug and bedding).

Here I’ve placed the large artwork above the bed as a focal piece as you walk into the bedroom.

Here I’ve placed the large artwork above the bed as a focal piece as you walk into the bedroom.

The best Lighting for Airbnb master bedrooms.

One of my pet hates is only having that one central overhead light in a bedroom. What are people thinking?! Thinking about the comfort of your guests means that dimmable warm LED bedsides lamps are a must, along with a dimmable overhead light if that’s an option. It’s all about making this space feel like home, and giving your guests the best chance to have a restful sleep. If you have the space think about including a combination of floor lamps, bedside lamps and overhead lighting to give your guests options to suit a variety of tasks.

Coastal style touches.

When choosing a lighting fixture that is in keeping with a coastal style think about the material type.

1. Table lamp bases made out of rattan, lime-washed ceramics or glass would all fit nicely within a coastal aesthetic.

2. Aim to choose light fixtures that are cohesive to the overall coastal inspired colours you are using within your living space. Remember that the lighting should complement your furniture choices.

The muted grey and blond timber bedside lamps both suit the style of the room and are functional for the space.

The muted grey and blond timber bedside lamps both suit the style of the room and are functional for the space.

The Best Art choices for Airbnb master bedrooms.

You can never have enough well-placed art in a space, and art really does make a rental feel like a home away from home. Choose artwork that ties in with your scheme, and for me using art from an Australian photographer show casing local beaches was a must. The artwork needs to make sense in the room, and if your personal taste is quite specific it may be helpful to choose art that appeals to a broad market (keep your quirky pieces for your own place). It is also an extra tick if you can choose art that references your location in some way, think about what makes your holiday rental special and unique and choose artwork that reflects that individuality.  

Coastal style touches.

For a more sophisticated take on coastal style, branch away from the typical shells, beach hat, footprints in the sand type of artwork.

1.       Artworks that references the texture of rope or driftwood reminds us of the beach without it being too obviously beachy.

2.       Abstract pieces with curves that connect to the shape of waves could also work nicely.

3.       Consider the colours of the coast; greens, blues, browns and whites all speak of a coastal vibe.

vingette1-web.jpg

You catch a glimpse of the artwork here, large piece showcasing some horses in the ocean (see @loveyourspace).

The Best Styling tips for Airbnb master bedrooms.

It’s all about the details when it comes to styling for cosiness. Perhaps for all the spaces in an Airbnb, the master needs to be enveloping and cocooning, so paying attention to styling makes all the difference on this front. Consider elements like the extra throws for the bed, ample cushions, meaningful book choices in keeping with the aesthetic and good quality artificial flowers (it really is tricky keeping real plants alive in a rental). Think about all your styling items as one group as they need to be cohesive and add to the overall vibe of the bedroom.

Coastal style touches.

If you love the coastal, Scandinavian style choose styling items that are within this style’s colour palette. Colours like pale blues, greens, creams and whites always feel coastal and fresh. You can also contrast these soft colours with some depth found in rust, terracotta, beige and greys. These colours can be sprinkled amongst your bed linen, cushions, lighting, furniture, art, rug and styling accessories.

bec-seat-web.jpg

Style every zone in your master Airbnb so that it is welcoming at first glance to your guests.

The Best Comfort tips for Airbnb master bedrooms.

One cushions on the bed isn’t going to cut it. We all know that most of the cushions we dress the bed with aren’t slept on, but if guests are reading in bed they need those extra cushions. Also consider the material type; for a bedroom it helps to have soft cottons and velvets in the mix. Try to pre-empt the needs of your guests and they will thank you by coming back. Another comfort tip to think about is different weights of blankets and quilts, having lighter and heavier options means guests sleep comfortably regardless of the weather.

1.       Aim for at least five cushions for a bed (consider a larger European pillow at the back, with smaller square or rectangle ones at the front) with one-two throws.

2.       Two cushions for an occasional chair, and a small side table within easy reach.

The next must have is a rug for underneath the bed. Even if your bedroom is carpeted a rug works wonders in grounding the bed, and adds even more softness under foot.  Another big plus for rugs is that they reduce echo and absorb sound. These qualities are key for guests to feel comfortable and secure.

1.       Your rug needs to be large enough to sit under at least the foot of the bed with enough width for guests to comfortably stand on.  

2.       The rug needs to be large enough to not look like a runner under the bed.

Coastal style touches.

Mix up your patterns and textures with your cushions and throws. This adds to the comfort level in terms of interest and depth.

1.       Move away from the overdone blue and yellow coastal colour theme (unless you absolutely love this combo, then go to town). Rather think about highlighting different textures that you might find in a coastal environment such as rope patterns or baubles.

2.       Choose a rug that highlights coastal elements such as jute or sisal if appropriate.

bed3-web.jpg

Don’t skimp on cushions and throws for a comfortable Airbnb space. These types of soft furnishings really do elevate your rental to the next level.

It’s a wrap….

There you have it, all the goodness on how you can go about creating a beautiful master bedroom that is perfect for a holiday rental getaway. Follow these tips for your own Airbnb master makeover and feel confident that you have done things right!

Did you know that I love helping people with their Airbnb projects? I will be sharing more in future blog posts on how to ‘Airbnb ready’ other rooms in the home to help you feel confident in this quite specific market, so follow along to learn more.

If the overwhelm is real and you’d like specific help for your holiday rental project then reach out to me at bec@designrelease.com.au or find me on Instagram or Facebook. I look forward to helping you bring your Airbnb vision to life.

A Before Master Bedroom: And simple inspiration to create calm

Small bedrooms can be such a challenge.

Would you like some tips for your small master bedroom?

Basic master.jpg

So many of us have small bedrooms these days. If you’re living in an apartment or unit, you can certainly relate to feeling the squeeze when it comes to the best bedroom layout for your space.  In reality you may only have one or two layout options that would work for your space – so you want to know you’ve picked the right one!

If you’ve stumbled upon this blog it’s actually one entry in a bigger story that is the journey of designing an Airbnb for my sister and brother-in-law. The challenges to make this happen were time, budget and space.

And how did it turn out? Beautifully!

It’s a testament to the fact that these common realities don’t have to limit a wonderfully functional and stylish space! (if you’d like to see the reveal of the open plan living area you can do that by scrolling through the blog titles at the bottom of this post).

But let’s keep on track because today we’re focusing on all things bedrooms - and more to the point designing small master bedrooms on a budget, that can indeed include everything you need without feeling squishy.

THE BEFORE PHOTOS.

One of the before photos of the main bedroom before its transformation.

One of the before photos of the main bedroom before its transformation.

Here’s a look at the before photos of the master bedroom of the unit. As you can see it was perfect for just my sister in law, but the floorplan needed more tweaking if it was going to work best for rental guests.

A few other angles of the same bedroom that needed a redesign ready for Airbnb guests.

A few other angles of the same bedroom that needed a redesign ready for Airbnb guests.

Here’s the master with its former furniture, all of which had to be replaced with robust and budget friendly options. The above photo also shows how space was truly limited – we had to make every centimetre count!

LAYOUT IDEAS.

Here’s a look at the layout I thought would work best. The important thing was to maintain a floorplan that allowed the master to feel spacious, whilst adding elements to create a comfortable, sophisticated space to retreat to.

Here’s the floorplan for the whole unit with the master bedroom up in the top left.

Here’s the floorplan for the whole unit with the master bedroom up in the top left.

Looking at the suggested floorplan drawing, the design was to incorporate a separate seating area within the master to allow guests the option of taking in the views whilst enjoying a coffee; separate from the open plan living. Having options of numerous living zones when staying at a rental property provides flexibility and an added layer of comfort.

3D DESIGN DRAWINGS.

Here’s the 3D drawings that helped to visualise how the master bedroom would materialise. These initial concept design drawings showed my vision to create a master bedroom with a statement bed (the hero piece in the room), along with a functional seating zone that takes in the views.

cropped master2.jpg

The beauty of the 3D drawings is that I could show how the actual art pieces I had chosen would work in the space, along with the colours of the rug. And let’s not forget the actual dimensions of the seating zone, to make sure it acutally fits before ordering anything too big!

Cropped master1.jpg

SNEAK PEAK OF THE AFTER LOOK.

Basic master.jpg

Here was the plan for how the space could look. Aesthetically it was all about colours and textures that evoked a feeling of the coast. I wanted to incorporate different textures of leather, rattan, timber and soft cottons to create an authentic holiday vibe, along with artwork that referenced the ocean to help guests be immersed in their seaside location.

In my next blog post I will reveal all the AFTER PHOTOS of what became a cocooning and restful coastal retreat. It was a master bedroom makeover on a budget, but with deliberate design choices and layout considerations it didn’t come up lacking. This project helped cement for me that you don’t need a huge master suite, as long as it highly functional and thoughtfully designed for the people who will call it home (even a home away from home). I’m sure many guests will have have happy holidays in this lovely space!

TIPS FOR YOUR SPACE.

What about your master bedroom? I’ve got a few tips for you if you’re working with a small space…

  1. Keep your colour palette restrained.

  • Choose 3-4 colours and stick with them. Too many colours can make a small space seems even smaller due to the fact that your eye is so busy trying to take everything in!

2. Measure out all your furniture pieces before buying.

  • The common mistake is buying a new bed that you’ve fallen in love with, before measuring the room and all the other pieces you might want to include (think bedside tables, rugs, extra seating, end of bed bench etc). Measure and tape out all furniture dimensions first - you’re after a spacious and functional space after all.

    3. Stick to a ‘look’.

  • Land on a style or look that most resonates with you, and stick to it. This continuity will help your space feel calming, cohesive and as spacious as it can. Carry your look through all your soft furnishings to look like a pro!

Perhaps this blog has inspired you to transform one of your own spaces. Would you like help with your master bedroom layout or furniture choices? Whether for an Airbnb endevour or your own home, I can help take out the guess work on budget, style and save you pesky mistakes that you just don’t know about until you make them!

Contact me at bec@designrelease.com.au - I’d love to help you in your room transformation.

Behind the Scenes at Design Release: More about Bec

Interested to learn how I moved into interior design?

Want to know why design is my noble profession?

I’m taking a slightly different tack today on the blog. I wanted to share some of my journey to becoming an interior designer and founding my little business, Design Release.

mantle-styling-edited.jpg

Whilst there are always many defining moments that lead people to begin a new venture, I thought it would be helpful to share a few of mine. This way you can get to know me a little better, but also it might encourage you to chase your own adventures if that’s something you’re considering. The truth is you can work hard in one career (or many careers), but equally you can shift and run after something completely new. All the experiences and knowledge you gain in life prepares and enables you as you move forward, nothing is wasted!

  1. Why design matters to me.

So how did I get to where I am today some of you might be thinking. Having my own design business sure is exciting, but it didn’t just happen with the click of my fingers (what a surprise hey!) What I’ve learnt along the way is that you have to be willing to go after what you love, what makes you come alive. For me that’s to serve and teach people through design – to help them create meaningful spaces that inspire and support them as they live their lives.

It sure has been a journey to arrive at this point, with many little sign post moments along the way. Let me share some of the story with you…

2. This design thing, it started young.

It’s a bit cliche, but I’ve always felt a certain way when it comes to a well-designed space. I have childhood memories of simple things like a border of photos that I created to run the whole length of my teenage bedroom, and the way it made me feel. Recognising how that simple photo border design made me feel, which was excited, safe, balanced and clear-headed all at the same time was a powerful early lesson for me. I recently stumbled upon a photo of my old bedroom and immediately I felt all those emotions again. This awareness and respect for how a space makes people feel has always been a bit of a hint that design would be in my future – and here we are!

3. Past chapters shaped my love for design.

Here’s me (many moons ago) enjoying my work as a midwife.

Here’s me (many moons ago) enjoying my work as a midwife.

Another part in my story is coming from a career in midwifery. While the realities of being a midwife are different to how it’s portrayed on the T.V. (the shift work isn’t that glamorous), it is still a highly privileged and sacred role on many levels. I discovered what a midwife was in Year 10 at high school. I remember saying to myself, that’s what I want to do!  I think it was the desire to help people and make a difference that fuelled me as a young person, along with all those tiny babies I imagined I’d get to cuddle!

Midwifery taught me vast amounts through all the women I had the honour to help as they birthed their babies. Yes, there’s all the obvious lessons learned and skills gained like the importance of: relationships, trust, communication, listening, perseverance, persistence, organisation, problem solving and working under pressure; but it was the deeper things I learnt like how critical it is to create a safe place for people to feel free to be themselves that has impacted me the most. And I know I’m repeating myself here, but listening and then listening some more to what people are really saying they want or need was perhaps the greatest gifts midwifery gave me.

4. My permission to go for it!

It was after I had transitioned out of midwifery to begin my life as a mum, (motherhood and disjointed shift work just didn’t mix well for me), that I was watching an episode of Fixer Upper and enjoying the home owners seeing the reveal of their new home for the first time. I remember being struck by the woman’s reaction to her new home, and how her response in the moment was incredibly similar to how women respond when they meet their babies for the first time (I’m feeling the tears well up even as I’m writing this years later).

I was quite overcome to hear her make the same sounds of pure joy and ecstasy, and whilst I had left midwifery at this stage, I knew it was confirmation to me that I could continue to be part of these sorts of moments as a designer. To play a role in helping bring that sort of joy to people’s lives is pretty profound and it cemented in me that being a designer wasn’t a lesser pursuit compared to midwifery, only different but with an equal opportunity to be just as meaningful. And from there I decided to grab design with both hands, and to choose to swim rather than sink as I moved into this new chapter of my life.

The love of styling my home is also another thing that confirmed my transition into interior design.

The love of styling my home is also another thing that confirmed my transition into interior design.

What’s this got to do with you?

We’re all on a journey to do that meaningful thing.

So, there’s a couple of snippets of my story that help explain where I am today. As I finish up, here’s the jist of the little pep talk I often have to give myself when I start to question my ‘why’ for going after my love of design (maybe it can be a pep talk for you as you go after your meaningful thing..)

I want to encourage you to go after your dreams, it’s never too late. Dream chasing certainly doesn’t guarantee an easy ride but when you are pursuing what you feel you should be doing with your life; you will feel truly alive in that crazy, flying by the seat of your pants sort of way. And what about those pesky feelings of fear?

What I’ve learnt, especially as a person who isn’t uber keen with jumping into the unknown, is that our bodies experience fear and excitement in much the same way (it’s funny, but true – think butterflies in the stomach, sweaty palms and a dry mouth), so I choose to think about those feelings as excitement instead! And when we think about the times we feel excited about something, it is generally because we are about to experience some degree of growth, change and forward movement in our lives! 

Share your thing!

I would love to hear about any dreams you’re chasing, or new things you are trying. It doesn’t have to be starting a business or changing careers, it could be a new goal you’ve set for yourself or something in the future you intend to experience. I want to cheer you on as you pursue your thing: you can never get too much encouragement! So comment below and fill me in….

Winter Wins: Focus on more warmth in your home.

Are you looking to prepare your home for winter?

Needing some simple styling tips to make your home feel more cosy?

I have been feeling the chill in my home lately. There is no denying that it has been getting colder, and in all honesty my home is not ready to welcome winter with open arms.

I’ve updated my bedroom for winter by adding extra throws and plenty of different types of texture (here I have some linen, velvet and quilted fabrics on my bed, along with different timber tones in the room for that cosy, warm feel.

I’ve updated my bedroom for winter by adding extra throws and plenty of different types of texture (here I have some linen, velvet and quilted fabrics on my bed, along with different timber tones in the room for that cosy, warm feel.

As it gets so cold in the Adelaide Hills, I’d even announced on a few occasions in Autumn that we are already in Winter (thankfully my kids have sorted me out on that confusion). Reminding myself that the chilly season lasts for around five months in this part of the world has got me needing to warm my place up, and in a hurry!

I sure do love getting outside in winter and enjoying that crisp air, but when I’m home I want to feel cocooned and warm. I’ve got months’ worth of firewood painstakingly stacked outside in preparation for this season because I have to feel toasty inside in order to feel happy (any other cold frogs out there relate?!)

So, I’m speaking to myself as much as to you with these simple updates to make our homes feel more cosy for winter. They’re easy to implement and will make a world of difference.

Warm Floors through Rugs.

There’s nothing worse than cold floors in winter. It’s a big contributor to feeling chilly in your home and easy to fix with rugs. Here’s some ideas on how to work with rugs in your home:

1.      Layer rugs together to create more softness underfoot. Where you might only use one rug for most of the year, you can add extra warmth by layering two rugs on top of each other (the one on top slightly smaller than the other).

2.      If you are purchasing a rug, look for one that is plush and soft while still durable. Also consider the size, as a rug that’s the right proportion for your space feels luxurious and grounding – perfect for the chilly season.

3.      Don’t be afraid to move rugs around depending on the season. If you’d love a rug next to your bed, move a rug from one area of your home into your bedroom just for winter.

4.      Remember to use rugs to create zones in your home. Zones make spaces feel more cosy and can help to enhance the feeling of warmth in your living spaces.

This textural jute rug brings a subtle warmth to my floors, which is so vital when you have a tiled floor as I do.

This textural jute rug brings a subtle warmth to my floors, which is so vital when you have a tiled floor as I do.

Layer your lighting.

Paying attention to your lighting and ensuring that you have warm light at different heights brings a beautiful warmth in winter. An overly bright, overhead light makes you feel like you’re in the spotlight, instead focus on creating soft glow lighting in a variety of locations in your home.

1.      Keep ceiling lights off once your kitchen and cleaning tasks have been done for the day.

2.      Focus on using floor and table lamps (with a warm globe) in numerous spots in your room.

3.      Choose lighting with textural and warm tones for extra warm vibes.

Bring in textural throws.

Texture is a key to helping your home feel toasty. Throws and blankets in highly textured materials help the room feel more welcoming to you and guests on a cold day.

1.      Swap out any light weight throws for thicker, heavier ones. Wash and store your thinner throws ready for when things warm up.

2.      Choose materials such as velvet and wool for winter throws. Look for thick cable knit patterns, the thicker the better.

3.      Use baskets to fill with throws in your living spaces, this allows guests to grab an extra blanket easily to stay warm.

4.      Now’s the time to have a few throws draped across your sofa arms, and a blanket across the back of a sofa (especially a leather one) to help keep the chill off.

Cable knit throws are the best for added texture and warmth.

Cable knit throws are the best for added texture and warmth.

Update Bedding.

We all know the difference flannelette sheets can make, so now is the time to update your bedding with all the warm goodness you can. Even if your bedroom is on the cool side (mine certainly is), having soft textured bedding ensures that you stay warm when you sleep.

1.      Replace cotton sheets with flannelette ones. Swap out your summer quilt for a heavier winter one and you will thank yourself.

 2.      Change your quilt cover if you have options for different times of the year. I have a darker toned quilt for winter, and a lighter one for the warmer months. Just doing this swap over is quite a nice ritual to welcome in winter.

 3.      Layer up your quilts. If you don’t have a quilt specifically for winter, you can layer two lighter quilts together which adds plushness and a cosy vibe for your bedroom.

Throws in different thicknesses make a bedroom winter ready. I’ve got a few options on the ready here.

Throws in different thicknesses make a bedroom winter ready. I’ve got a few options on the ready here.

Try Candles and Scents.

Rather than turning all your lights on in an attempt to beat the darker, colder days embrace this season with the beauty of candles. Even lighting a few candles while you eat dinner, or as you chat in the evenings, brings a considered quality into your home.

1.      Group smaller candles together on a table as a centrepiece for real impact.

2.      Place a few candles at different heights, such as on top of a console or ledge, as well as on a dining table/coffee table to really create a welcoming space.

3.      Use scented candles with lavender, pine needles or anything that reminds you of winter to tickle all the senses.

4.      If safety is a concern with young children, use a scent diffusor instead of candles for a similar effect.

Grouping candles together on a table (like I have here on the chest of drawers), always makes more of a statement than just a single candle alone.

Grouping candles together on a table (like I have here on the chest of drawers), always makes more of a statement than just a single candle alone.

Consider a Warm Palette.

Whilst you can always use whatever colour palatte brings you joy in your home; it is helpful to remember that warmer tones do make your space feel cosier for winter.

1.      Swap out artworks that don’t seem to suit the season. Artworks of a beach scene in the height of summer, whilst a great distraction from the cold will seem out of place in your home during winter.

2.      Choose more subdued, simple artwork that echos the season (line drawings and winter nature prints would work well).

3.      Replace bright, cool tone coloured cushions with warmer alternatives. Tones such as gold, mustard, burgundy, cream, beige and taupe work a treat to warm up a space. These colours compliment beautifully a room with other cooler tones (such as wall paint colour, or furniture choices that can’t be updated as easily).

I love these tones of taupes, greys, blacks against the texture of this chunky basket and plywood wall. This mix of colours encourages a hunkering down and an embracing of winter. Rather than fight against the sort of colours you see in the winter l…

I love these tones of taupes, greys, blacks against the texture of this chunky basket and plywood wall. This mix of colours encourages a hunkering down and an embracing of winter. Rather than fight against the sort of colours you see in the winter landscape try bringing them inside for a cohesive look.

Plants and Foliage.

We all know the benefits of having plants in our home. When helping our homes feel cosy in winter our plants are key, as when it’s raining and difficult to get outside, we still can benefit from nature in our homes.

1.      Some of your indoor plants may need more sunlight in winter, so consider moving them for maximum light. Some plants are prone to drying out from the heating systems in our home, so research their watering requirements. We need our plants looking their best!

2.      Do some foraging outside for foliage. I often bring in some small branches from my deciduous trees, and even if the leaves fall after a few days the beauty of the bare branches bring depth and interest. Hardy natives and wattles look lively and interesting inside too.

3.      If you don’t have a big garden, reach out to a friend or neighbour for some greenery.

4.      Don’t underestimate a small arrangement of foliage in your bathroom or second toilet. These little touches make us smile and help our homes feel cared for when all is dreary outside.

A reached out to a friend for this beautiful blue gum eucalyptus. Any foliage on mass helps to bring the outdoors inside - this is particularly helpful when it can be harder to venture outside in the colder months.

A reached out to a friend for this beautiful blue gum eucalyptus. Any foliage on mass helps to bring the outdoors inside - this is particularly helpful when it can be harder to venture outside in the colder months.

Create some Winter Nooks.

The way we live in summer and winter is different. In winter, the aim in our homes is to feel warm, cosy and secure. Creating little nooks and areas in our home that promote stillness, conversation and selfcare will go a long way in the winter months. Being open to changing up the layout in your home may make all the difference to how well your home embraces all things winter.

1.      Are there corners of your home you could could create a reading nook? All you need is a comfortable chair, something soft underfoot, a small side table and a lamp. You may find yourself relaxing and using your home in a different way that is just right for winter.

2.      Consider bringing your living room furniture closer to create a more intimate zone that can easily be cocooning with candles and soft lamps.

3.      A sure way to create that elusive cosy factor is to move your furniture closer to your heating source. If your split system is at the opposite end of your living space for example, think about swapping zones around so you are closer to the heat when you appreciate it most.

4.      If you have a combustion fire this is one of the best ‘cosiness’ features and you want to soak it in at every opportunity. Set up a conversation zoom near the fire, you’ll never regret you did.

A combustion fire is always the winner in warming up your space for winter. This is why my wood pile is bigger than Ben Hur!

A combustion fire is always the winner in warming up your space for winter. This is why my wood pile is bigger than Ben Hur!

So there you have it…

Follow all these steps, or just pick a few that you think you could pull off to help create a home that can beat the winter blues. I’d love to hear what tips you implemented, or if you have some tips of your own that you can recommend. Leave a comment below or connect with me at bec@designrelease.com.au and let me know your winter busting strategies!

In the meantime, just know that I’ll be hunkering down next to the fire with my cup of tea – my happy place when it’s like the Artic outside. Until next time!

The Secrets to a blissful Airbnb Coastal living space

Are you considering setting up an Airbnb and would like to learn some secrets for setting up the living space?

Like to learn more on how to inject some coastal style into the space?

In this post I will I want to take you through the steps I considered to turn a slightly tired looking unit into the fresh Airbnb coastal living space I knew it could be.

IMG_9475.jpg

Before we jump in, let me refresh you on the back story…

The backstory to the Airbnb worthy makeover.

I remember standing in this tired looking unit trying to imagine all that it could be. I felt slightly out of place measuring up the dimensions of each room while it was still filled with a stranger’s belongings. It was obviously somebody’s home and they had set it up to work perfectly for them, but I needed to turn this little unit into something that would appeal to the holiday rental market – and I didn’t have a lot of time on my hands to make it happen.

The unit had been the home of my sister in law until she had decided to rent it out. And to recap on my previous blog post, she had approached me with the idea of turning it into a seaside Airbnb. She asked if I could help her bring the future holiday rental to life and of course I said yes!

But like anybody, standing in the unit that day I faced feelings of overwhelm thinking how was I going to deliver on the vision I knew my sister in law had for her future Airbnb. I can relate to the challenge that it is to look past what is already in a living space and see it with fresh eyes!

IMG_9410.jpg

My tips to achieve a coastal Airbnb living space.

Here’s the steps that helped move me from confusion to clarity as I tackled the transformation of the living area. I hope these steps are helpful if you’re trying your hand at your own coastal Airbnb makeover, or if you’d just like to know more about how I pulled it off…

The best layouts for Airbnb living spaces.

There is lots to consider when it comes to layout. I could probably spend a whole blog post just focusing on what makes a great Airbnb layout (one for another day perhaps). The main thing I’d like you to focus on is your future guests, not what would work for your own personal living room.

There needs to be enough seating options for the number of guests your Airbnb can sleep. Consider moveable seating, items like occasional chairs work at a treat because they bring some interest into the room and they are flexible. Your guests will feel at home in a space that encourages conversation, and that doesn’t happen when everyone is sitting on one long sofa.

Make the room feel spacious. Practically if you’re working with a small area (like I was) it’s good to think about how people will move around the room as you want it to have an instinctive flow. This means leaving plenty of space to move around your seating and coffee table, and ensure that you can easily access doors and walkways.

Specifically, for a small Airbnb living space:

1.  Have artwork, not the TV be the focal point as you enter the room.

2.  Maintain a connection between the living and dining spaces (for an open plan layout)

3. Keep the styling and colours cohesive throughout the whole room.

4. Block colours work well for small areas (e.g. furniture that is all one colour rather than mixed).

Coastal style touches.

Typically, a coastal/Scandinavian look is light and airy, fresh and textured. Think about how your layout can highlight those styling choices best as your guest first enter your property.

1. Position furniture so guests can see all your cushions/throws on entry. It’s these items that pick up your coastal colours and textures.

2.  Have lightly toned furniture as a feature (I chose a white coffee table and wanted this fresh element to stand out).

3.  Always feature texture in your layout. Use small elements such as rattan and jute as a highlight to draw the eye (I used a rattan occasional chair and textured wall décor in this way).

Here you can see the artwork as the focal point as you enter the property.

Here you can see the artwork as the focal point as you enter the property.

Here is the T.V. positioned on the entrance wall as you enter the property. It’s tucked out of first sight but situated for comfortable viewing in the evenings.

Here is the T.V. positioned on the entrance wall as you enter the property. It’s tucked out of first sight but situated for comfortable viewing in the evenings.

The best Lighting for Airbnb living spaces.

One overhead ceiling light doesn’t evoke a feeling of mood or relaxation. In the same way that you use lamps and dimmers at home your guests want to feel that ‘home away from home’ feeling too, not the ‘I’ve just stepped into a government building’ sort of sterility. Use warm LED globes and have multiple options of lighting for that cosy feel. Think about including a combination of floor lamps, table lamps and overhead lighting to give your guests options to suit a variety of tasks.

Coastal style touches.

When choosing a lighting fixture that is in keeping with a coastal style think about the material type.

1. Table lamp bases made out of rattan, lime-washed ceramics or glass would all fit nicely within a coastal aesthetic.

2. Aim to choose light fixtures that are cohesive to the overall coastal inspired colours you are using within your living space. Remember that the lighting should complement your furniture choices.

The floorlamp ties in beautifully to the overall coastal look and gives addition mood lighting.

The floorlamp ties in beautifully to the overall coastal look and gives addition mood lighting.

The Best Art choices for Airbnb living spaces.

Even on a tight budget you need add to bring personality into the space. Art is a must and this is an area where I would allocate ample budget and not skimp! Choose artwork that ties in with your scheme, and for me using art from an Australian photographer show casing local beaches was a must.

For your living space to feel cohesive the art needs to make sense in the room. You can do this by thinking about your location or any history that makes your holiday rental special and unique and choose artwork that reflects that individuality.  

Coastal style touches.

For a more sophisticated take on coastal style, branch away from the typical shells, beach hat, footprints in the sand type of artwork.

1. Artworks that references the texture of rope or driftwood reminds us of the beach without it being too obviously beachy.

2. Abstract pieces with curves that connect to the shape of waves could also work nicely.

3. Consider the colours of the coast; greens, blues, browns and whites all speak of a coastal vibe.

Styling the living space makes it feel like a home and this is something that will make guests come back for more!

Styling the living space makes it feel like a home and this is something that will make guests come back for more!

The Best Styling tips for Airbnb living spaces.

If it feels empty, it feels unlived in and cold. Your aim is for guests to walk into a warm and inviting space and this is where the design is in the details. Think about all of those small touches like books, vases, flowers, baskets – these are the things you can’t skip on if you want your guests to feel at home.

For your styling to really elevate your living space up a notch, remember to keep your book choices within your chosen theme (for coastal, think beautiful books on beaches, coastal living, coastal inspired recipes for example). Even consider the colours of the book covers and remember that they will stand out like a sore thumb if they aren’t consistent with all your other carefully chosen accessories.

Coastal style touches.

If you love the coastal, Scandinavian style choose styling items that are within this style’s colour palette. Colours like pale blues, greens, creams and whites always feel coastal and fresh. You can also contrast these soft colours with some depth found in rust, terracotta, beige and greys. Remember these colours can be picked up in your choice of sofa, rugs and other furniture too.

I added some jute wall decor above the T.V to bring some softness and warmth through texture!

I added some jute wall decor above the T.V to bring some softness and warmth through texture!

The Best Comfort tips for Airbnb living spaces.

Two cushions on the sofa isn’t enough. More is more when it comes to comfort, and your guests will feel well taken care of when they have ample cushions and throws to cuddle. It also helps to think of throws in different weights and cushions with different textures. Different textures in a living space really elevates that feeling of comfort, if everything is flat in terms of texture there is nothing to sink your toes into, or wrap yourself up in and it just doesn’t feel as homely does it?!  

1.  Aim for at least five cushions for a sofa with one-two throws.

2.  Two cushions for an occasional chair.

The next must have is a rug for your living space. Not only does it help to create a zone for relaxing and conversation, it also makes your guests feel more comfortable. Whilst it does make sense to think about a rug that is durable and practical please don’t skip on it all together. Another big plus for rugs are that they reduce echo and absorb sound. These qualities are key for guests to feel comfortable and secure.

1.  Your rug needs to be large enough for the front feet of your furniture to sit on (sofas and occasional chairs).

2. The rug needs to be wider than your chosen sofa so it doesn’t shrink the room.

Coastal style touches.

Mix up your patterns and textures with your cushions and throws. This adds to the comfort level in terms of interest and depth.

1.  Move away from the overdone blue and yellow coastal colour theme (unless you absolutely love this combo, then go to town). Rather think about highlighting different textures that you might find in a coastal environment such as rope patterns or baubles.

2. Choose a rug that highlights coastal elements such as jute or sisal.

The colours of greys, greens, blues, creams and whites add comfort when paired with some browns and rusts for depth and contrast. The cushions have texture to bring added comfort and warmth.

The colours of greys, greens, blues, creams and whites add comfort when paired with some browns and rusts for depth and contrast. The cushions have texture to bring added comfort and warmth.

It’s a wrap….

There you have it, all the goodness on how you can transformation your living space into one that ticks all the boxes for a perfect holiday rental getaway. Follow these tips for a smooth and considered Airbnb coastal living space makeover.

Did you know that I love helping people with their Airbnb projects? I will be sharing more in future blog posts on how to ‘Airbnb ready’ other rooms in the home to help you feel confident in this quite specific market, so follow along to learn more.

In the meantime if you’d like to see the before photos for this delightful project and my design for the space, you can check that out in the latest blog post below.

Or if the overwhelm is real and you’d like specific help for your holiday rental project, then reach out to me at bec@designrelease.com.au or find me on Instagram or Facebook. We can brainstorm and problem solve together!


Spotlight on a living space guaranteed a remarkable new look

Who can relate to the challenge of having to redesign their space with a limited budget – and not a lot of space to play with?

Anyone living in a unit or apartment could well relate to this dilemma. There are only so many places where things can go in a tiny space, and so you have to think hard to land on the best layout.

Basic-living.JPG

I came up against this scenario when I was lucky enough to help my sister and brother in law in setting up their apartment to be rented on Airbnb. The limitations were primarily space and money, but on top of this they also wanted to get the apartment ready for occupancy as soon as they could. The result? A design with lots of restraints, but as you often find that can produce the best sort of results.

Their preferred style was a mix of Scandinavian and Coastal, and it was important for all the furniture and décor to be child-friendly and robust enough to handle holiday rentals wanting a weekend away at the beach.

THE BEFORE PHOTOS.

But before I get ahead of myself, here’s a look at the before photos of the main living area of the unit. As you can see it was perfect for just my sister in law, but needed a total floorplan revamp if it was going to work well for four rental guests.

One of the before photos of the unit before its transformation.

One of the before photos of the unit before its transformation.

As you can see it was quite a cute little space. This photo shows the front door and a sense of the amount of space we had to design a workable living and dining area for up to four people. That generous sized sofa had to go!

A second photo looking from another angle in the room.

A second photo looking from another angle in the room.

Here’s a view of the room looking from the front door. Again, it brings home how space was of a premium.

LAYOUT IDEAS.

Here’s a look at the layout I thought would work best. The important things were to create a space where the dining table was close to the kitchen, while still creating a relaxing lounging zone.

Floor_plan.JPG

Looking at the suggested floorplan drawing, the design was to incorporate a round dining table close to the entry to the kitchen, re-orientate the sofa and television to provide plenty of room for guests entering the apartment and to place artwork on the wall for a beautiful focal point

3D DESIGN DRAWINGS.

main living-updated.JPG

Here’s the 3D drawings that helped to visualise how the new dining area would materialise.

cropped3d-living.jpg

From this view looking back from the entry into the unit, these initial concept design drawings showed my vision for a cohesive space that allowed for a separate zone for dining and living. The space might have been small, but that didn’t mean it couldn’t function at its peak whilst still looking stylish and welcoming.

SNEAK PEAK OF AFTER LOOK.

Basic-living.JPG

Here was the plan for how the space could look. Aesthetically it was all about natural materials like jute, rattan, leather and timber. I wanted to mix these with some contrasting and fresh white pieces, along with touches of blues, greens to reference the ocean in the artwork and the location itself.

In my next blog post I will reveal all the AFTER PHOTOS of what became a fresh and welcoming coastal retreat. It was a living room makeover on a budget, and a small living room at that, but with careful thought and consideration proved that lovely things can come in small packages!

How to work with a Virtual Interior Designer.

Would you love to update a space while stuck in self isolation?

Do you have plenty of design ideas but unsure on how to pull them together?

Lacking inspiration but determined to make a change while you have some extra time?

Whether it’s due to the Covid-19 self isolation situation, or wanting affordable interior design advice, working with a virtual interior designer may be your answer!

I’ve got lots of samples of paint, fabric and finishes to help me make the best choices for your space.

I’ve got lots of samples of paint, fabric and finishes to help me make the best choices for your space.

One of my values for Design Release is to make interior design and decorating accessible to people of all walks of life. Even though Design Release is based in Woodside in the Adelaide Hills, I have clients all around the Hills and metropolitan Adelaide. It’s wonderful to be able to travel and meet clients face to face, but in this current climate there is another way that we can work together. Thanks to Zoom and other video chat software, I can work with clients in any location as a virtual interior designer. In the same way that so many small businesses are jumping online to continue their service at the moment, the design, decorating and styling process can happen virtually too.

If you’ve never heard of virtual interior design (sometimes known as e-Design or online design), you’re not alone as I’ve found that it’s an unfamiliar term to many. So, let me fill you!

The great thing about virtual interior design is its flexibility. Whether you are looking for help to refresh a whole room or multiple rooms, right down to wanting some advice on small decorating decisions – all this is can happen virtually.

Here’s an example of a selections board I put together for an eco-friendly, gender neutral nursery.

Here’s an example of a selections board I put together for an eco-friendly, gender neutral nursery.

So, how does it work?

My e-Design package consists of 3 steps.

  1. Questionnaire & Measure Up

    Fill out my e-Design questionnaire which helps me understand your style, lifestyle, budget and timeline. This helps us be on exactly the same page when it comes to your specific needs and wants.

    Then take some pictures of your space and measure it up. I will walk you through this part of the process, and it’s no way near as complicated as you think.

2. Moodboard & Selections Board

The next step is where the fun really begins. I’ll put together a moodboard, which is a collection of images, digital materials and colours to make sure I have understood your vision clearly. Once approved I get started on presenting you with a selections board. This can incorporate anything from furniture, paint colours, flooring options, light fixtures, window coverings, styling accessories and more.

This is a collaborative process and I make sure that you are completely chuffed with the selections before sending you the completed board. Along with the selections board you’ll also receive a shopping list of all the items, along with a styling document so you have confidence in putting your new space together.

3. Online Shopping

Now that you’re armed with all the resources you need, it’s shopping time! You simply use your shopping list to order items online (or organise to visit retail shops to see items in person) and then use the styling guide to create your space down to the last detail. If you’d rather skip this step due to lack of time (or patience), I also offer an extra service where I organise the ordering and delivery of all your items. How easy is that?!

Here’s a selections board for a shared bedroom for a brother and sister.

Here’s a selections board for a shared bedroom for a brother and sister.

Like to know what’s included in a Design Release e-Design package?

  • A personalised moodboard. Personalised to the colours, style and images that resonate with you. This helps me check that I am understanding your wants and needs. Includes x1 revision if necessary.

  • A selection board which shows all the items that will be going into your room. This can include furniture, paint colours, lighting, accessories and window coverings, and shows how they will all work cohesively together. Includes x2 revisions if necessary.

  • Your shopping list with quick links to take you straight to the websites you need to purchase your items.

  • A floorplan to show where your new furniture will be placed.

  • 3D digital drawings so you can visualize your new space.

  • A styling document which ensures you know exactly how to ‘finish’ off the space with all those little details.

  • Don’t forget your optional service where I will organise ordering and delivery of all your items if you prefer.


So if you’re feeling cooped up and would love to get working on a space on your home that could do with a refresh, update or re-do, now’s the time! With the help of a virtual interior designer you can access design expertise in an affordable and accessible way, and that’s something that Design Release is passionate about.

Next Steps

If you’d like more information about my E-Design service to see if you would be suitable, or if you have more questions book a complimentary 15 minute phone call with me to find out more.  Or you can email me at hello@designrelease.com.au I would love to help you create meaningful design through the wonders of e-Design.